Saturday, April 23, 2022

T is for Taco Monkey Bread


#AtoZChallenge 2022 Blogging from A to Z Challenge letter


Just like it never occurred to me to make a sweet quesadilla until I tried them in Q is for Quesadilla, the opposite could be said for monkey bread. I've made it for my family for years. It's super simple: canned biscuits, each cut into quarters, dipped in butter, then rolled in a cinnamon and sugar mixture before layering in a bundt pan and baking. 

Then I found a recipe for Taco Monkey Bread. Canned biscuits (the recipe called for Pillsbury Grands), taco meat, shredded cheese, salsa. I only needed to go to the store for the canned biscuits (and I used Great Value instead of Pillsbury, partly because they are cheaper and partly because that's all they had anyway, and I'm not even going to get into the math involved because they only had small 5 biscuit cans and the recipe called for two 8 biscuit cans). 

I browned the ground beef, which was actually a combination of pork and beef that the local hamburger monger* sells for much less than straight ground beef and added a packet of taco seasoning. 

Browning the meat

The directions said to cut each biscuit in half, flatten it, and wrap each half around a spoonful of taco meat. I flattened THEN cut in half and wrapped, which I believe was much more efficient (work smarter, not harder!). I used a cookie scoop to plop some taco meat onto the rolled out biscuit half before sprinkling on a little bit of shredded cheddar cheese and gathering the dough around the filling, all the while having flashbacks to the Pig Buns once again. It was quite tedious, but my dad sat at the table with me while I made each monkey ball and told stories of his aunts and uncles from when he was a little kid, so time passed rather pleasantly.


One biscuit, flattened, halved, and half stuffed


It became very clear that maybe half a scoop of meat was all that would fit and allow enough dough for wrapping all of it into a ball. Each monkey ball was the size of a ping pong ball and took up a lot of space in the pan. The first layer was only one ball across. The second layer was two balls across, and there wasn't room for a third row unless I wanted monkey balls to overflow the pan into the oven (and the answer to that was I certainly did NOT, as I had run the self-cleaning cycle on the oven that morning and rid it of a great deal of pizza ingredients that had fallen off the many Aldi pizzas my dad has baked over the past few months). Each layer of monkey balls were sprinkled with cheese, and the whole thing went into the oven.

One monkey ball, two monkey balls....


Ready for the oven


The instructions were to bake for 25-30 minutes in a 350 degree oven. I set the timer for 20 minutes, and when I checked the monkey balls, they were puffy but very, very pale. I upped the oven temperature to 400 degrees and baked them another seven minutes or so. This time, they were beautifully golden brown. I inverted them onto a pan and served them to my dad and husband with salsa.

Individual monkey balls visible


Monkey balls without definition....
I failed to take a photo of a slice of monkey balls


Whether sweet or savory, the reason for the name "monkey bread" varies, but most often, it is said the name is because it is eaten with one's fingers, as a monkey would do with food. I always thought it was based on a monkey picking nits off another monkey and eating them. Take your pick (no pun intended). Anyway, I bring this up because the balls grew together rather than being individual balls that can be pulled off like, well, nits. We used a knife to cut the monkey bread into slices and dipped chunks of it into salsa before eating.

I thought the whole dish was too bready (or biscuity, in this case) and the meat was lost in it. My dad thought the balls should have been made from a whole biscuit instead of a half biscuit so more meat would fit inside. My husband said it was REALLY good and he liked it the way it was.

My take? I'd rather just have tacos.

* my husband and I have always had a good laugh when we watched Martha Stewart and heard her talk about going to your "local fish monger" to get fish for a recipe. How many towns have fish mongers, anyway? We have Walmart and Aldi to choose from for our ingredients, and I assure you, there are no fish mongers at either place. When at the lake house, however, there is a grocery store with real, honest-to-goodness butchers; hence, our hamburger mongers.


Friday, April 22, 2022

S is for Souper Simple


#AtoZChallenge 2022 Blogging from A to Z Challenge letter


I was in need of something simple for today's A to Z Challenge post, and I needed something to go with the Rainbow Grilled Cheese from yesterday's post. What goes better with grilled cheese than tomato soup? Not much, that's what! And what's WAY better than canned tomato soup (not knocking it; I eat it all the time)? Why, how about Copycat Panera Creamy Tomato Basil Soup!

Full disclosure: I have never EATEN Panera's Creamy Tomato Basil Soup, so I cannot tell you whether or not this copycat recipe is anywhere close to the real thing. But I CAN tell you that it was quite tasty and quite simple to make.

The ingredients were in my pantry (I typed "panty" there and am so glad I caught it, because spellcheck sure wouldn't have): 28 oz can crushed tomatoes, 28 oz can diced tomatoes, 14 oz can chicken broth, sugar, a cup of heavy cream (rest assured, in my fridge, not in my pantry), garlic, butter, and fresh basil (okay, not in my pantry, either, but I will have it growing in my windowsill herb garden soon).


Put the two cans of tomatoes in a large pan, along with the broth and garlic. Bring it to a boil and let it boil for 10 minutes. Reduce the heat to low and add the sugar and butter, stirring until combined.

Crushed and diced tomatoes,
boiling madly

We interrupt this recipe for an announcement: I don't like chunks of tomato, so at this point, I dug out the blender, scooped out most of the tomatoes, and gave them a bzzzzzzzt in the blender to unchunk them, then added them back to the pan. We will now return to regular recipe following.

Slowly pour the cream into the mixture while continuously stirring with a whisk (the recipe doesn't say "whisk," but I say it; the cream blends into the other ingredients much easier with a whisk). Stir in 15-20 basil leaves that have been chopped (or scissored), and serve. Oh, and as terrific as the whisk is for blending the cream into the rest of the mixture, do not, and I cannot say this clearly enough, DO NOT use the whisk to stir in the basil, as I am about to do in this photo, as the basil wraps itself around the whisk and becomes a seaweedy-looking mess that has to be picked off and dropped back in the soup, or so I've heard....

See? Whisk.

My husband was extremely impressed with the soup (not so much with the Rainbow Grilled Cheese that I served alongside it) and said I should make it often. I'd say that's a pretty big win for maybe 15 minutes of work!

Rainbow Grilled Cheese got a "meh" but the
Tomato Basil Soup got a "yeah!"


Thursday, April 21, 2022

R is for Rainbow Grilled Cheese


#AtoZChallenge 2022 Blogging from A to Z Challenge letter


I should have learned my lesson with the Pig Buns about choosing projects from Pinterest that are only a video, but I didn't, and that's how I came to make Rainbow Grilled Cheese. 

The ingredient list is short: shredded mozzarella cheese, bread, butter, and food coloring. The shredded cheese is divided into four bowls, food coloring is added to each bowl and stirred into the cheese. I picked up a package of neon gel food coloring to use for this project. I'm not sure any of these colors have ever in a million years been found in a rainbow, but they were going to be in MY rainbow! I wasn't sure how well the gel food coloring was going to mix in with the dry cheese, and the answer to that is not well. It took MANY squeezes of food coloring to get most of the cheese colored, and it was very, very messy to combine the two.


Shredded mozzarella with squeezies of
food coloring, pre-mixing

Post-stirring. I SAID it was messy


I buttered a slice of bread (I used English toasting bread, because it makes good grilled cheese sandwiches), laid it in the skillet, then arranged each color of cheese on the bread slice into four stripes, then topped with a second slice of buttered bread and cooked until golden brown on one side before flipping it over and browning the other side.

Sprinkling rainbow cheese stripes
onto the bread and rainbowing my
fingers in the process.

To serve, I cut the sandwich on the diagonal, because that's the way my mom always cut my sandwiches, and it's also the best way to show all the colors of cheese. I made two sandwiches, one for me and one for my husband, and served them with tomorrow's "S" entry (tease!). 

Strangely shot photo of the inside of
my grilled cheese. It looks like
frosting, but it is not.


My husband's first reaction was, "Why?" I replied, "Because it's unusual and it starts with "R." 

His next question, "What kind of cheese is this?" "Mozzarella," I said. I had considered using white cheddar, since mozzarella is pretty bland and flavorless unless it's good mozzarella and on a pizza, but I stuck with the recipe, mainly because I couldn't buy white cheddar already shredded, and I was too lazy to shred it myself.

"I can taste the food coloring," my husband then said. "You can't," I replied, but he insisted he could, so I assured him that I was NEVER GOING TO MAKE HIM A RAINBOW SANDWICH AGAIN AND COULD HE JUST EAT IT FOR THE SAKE OF THE BLOG POST.

When he finished his sandwich, he said, "It wasn't bad, I just still don't understand why."

Sigh.


Tuesday, April 19, 2022

Q is for Quesadilla


#AtoZChallenge 2022 Blogging from A to Z Challenge letter


My friend Nikki suggested quesadillas for my "Q" post (this after I begged for ideas at work), and at first, I dismissed it as too ho hum, to every-day. After all, I have fed a LOT of quesadillas to my family over the years. They are quick and easy. I always have the ingredients for them, especially since all my kids liked on them was cheese. I even experimented with some variations (not for the kids, since they made their likes known at an early age), the best one being Pizzadillas, made with mozzarella cheese, diced pepperoni, and dipped in marinara sauce instead of salsa.

THEN Nikki upped the game by sending me a link to a recipe for a cream cheese, raspberry, and pineapple dessert quesadilla. I had all the ingredients (except for fresh raspberries, but those were easy to pick up). Game on.

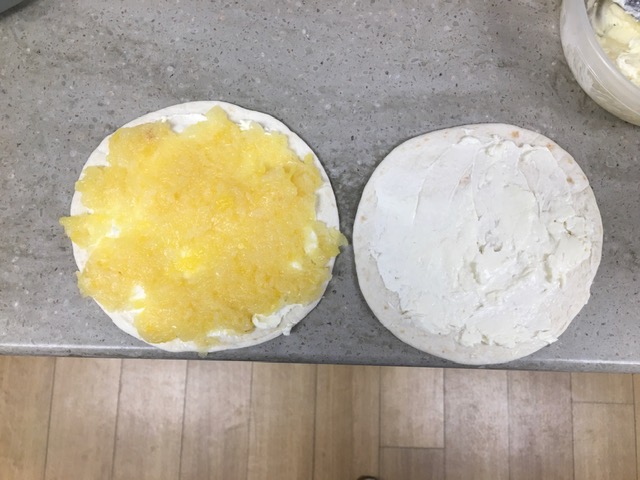
This is a triple decker quesadilla, and it wasn't difficult, but it was INCREDIBLY messy. It is made by spreading cream cheese on two 6" flour tortillas, then spreading a couple tablespoons of drained, crushed pineapple on one cream cheese coated tortilla. Flip the second tortilla cream cheese side down on top of the pineapple. Spread raspberry jam over that tortilla and sprinkle on some chopped, fresh raspberries, then top with the third tortilla. Put the whole thing in a lightly greased skillet, cook until golden brown, turn it over CAREFULLY and do it again. Let cool slightly before you try to cut it into sections (and be aware that the whole thing is going to slip and slide and make a gigantic mess the second you touch it with a knife). I sprinkled mine with powdered sugar before serving.


Cream cheese topped with crushed pineapple on left,
just cream cheese on right. Right one flips onto left one.


Spread jam on what is now the bottom of the
tortilla spread with cream cheese


Sprinkle chopped, fresh raspberries on top
of the jam.


Guess I didn't take any in the pan or after it
was cut. Imagine this is a skillet with crushed
pineapple falling out onto the hot pan and
snapping and sizzling.


I'm not a big fan of pineapple, so I looked for (and found) a recipe that I, again, had all the ingredients for: Caramel Apple Quesadillas. Tortillas (duh), a can of apple pie filling, and caramel dip for apples. Because the triple decker quesadillas were such a pain to flip and to cut, I made the caramel apple quesadillas the same way I do cheese ones: by spreading the pie filling and caramel on half the tortilla and folding the other half over and then cooking, and this was AFTER I tried to do it by keeping the tortillas flat and failing miserably.  It's definitely MUCH easier to flip and to cut when you fold the tortilla rather than cooking it flat, especially since the pie filling AND the caramel were slippery and kept trying to get away (the apple pieces were quite successful at making their escape). I started spreading some of the cream cheese on the tortilla to act as glue for the apple pie filling. It didn't work, but it sure did taste good!

Took the photos before I learned that it
works much better to put the ingredients 
on one side and fold the tortilla in half.


The caramel might ooze out a bit....


This was after I wised up and started
folding the tortilla over. Slightly neater.
Caramel still oozing crazily


I made these at school so I could share with the rest of the staff, and that somehow prevented me from taking photos not only of the cooking quesadillas, but also of the finished product on serving dishes. That doesn't really matter, since they were deemed to be delicious by everyone who ate them. Well, all except for Nikki and the cream cheese, pineapple, and raspberry quesadilla. Remember how she is the one who found the recipe and sent it to me?

She. Doesn't. Like.  Pineapple.

Make some of these. You don't really need a recipe. Put what you want between two tortillas (or do yourself a favor and put it in one folded in half). It's good eats.


Monday, April 18, 2022

P is for Pig Buns


#AtoZChallenge 2022 Blogging from A to Z Challenge letter


P is certainly NOT for pre-planning my A to Z posts, because while I had a handful of them planned and even executed well before the deadline, I kind of piddled out by "P." Thank goodness for Pinterest. 

Introducing...Pig Buns. 

There's a little video clip at the top of the web page for this recipe that hooked me, and if I were smart enough to be able to embed it on this post, I would. Just do yourself a favor and hop over to the site and watch it. It's only about a minute, and you will see what hooked me.

To make Pig Buns for an A to Z Challenge post that needs to be published tomorrow, you should have looked at the recipe before today. I imagine it's obvious I didn't, so it's 10 pm as I write this, and the project is barely started.

If I had read the recipe yesterday, I would have done the first step yesterday, which is to spoon strawberry jam (I'm using raspberry because I like it better and the end result should be the same) into ice cube trays and freeze for a minimum of 4 hours. When our refrigerator died in January and we had to buy a new one, among the many other things that went wrong with getting the refrigerator delivered and installed was that the ice maker was on back order for at least 6 months. As a result, we have two ice cube trays in the freezer at all times (we are big time ice users), so I had to sacrifice one of them to freeze the jam (I would have sworn we had some cheap, blue ice cube trays in the basement, but they were nowhere to be found). 

I had not realized how much this looks like congealed
blood until I saw the photo I took. Eww.

After the jam went into the freezer, I messed around in the kitchen with something for "Q" (no spoilers), washed some dishes by hand and loaded the dishwasher. When I got bored with that, I went upstairs and took a little cat nap in my big comfy chair, then wandered back down to the kitchen to start the dough. 

The recipe is from the UK, so all the measurements are in grams and milliliters. I am fortunate that our kitchen scale can be programmed to give weights in grams, or I would have been looking for another "P" project. It's a straightforward bread recipe: let the yeast proof in warm milk, then beat in eggs, butter, and sugar in a stand mixer, followed by the flour and some salt. Add red food coloring to make the dough pink, then use the dough hook to knead the dough about 4-5 minutes. Transfer to a greased bowl (or turn the dough out onto a cutting board, wash and dry the Kitchenaid bowl, grease it lightly with cooking spray, plop the dough back in the bowl, cover it, and place the bowl in a warm place; in my case, I turned the oven on and set the bowl on the back of the stove to get warm, as my kitchen is cold).

Measuring in weight, not volume.

'
The dough coming together, food
coloring added


Pretty in pink.


After an hour, the dough had doubled in size, and I used my trusty scale again to help measure the dough into roughly equal portions of 85g (more or less). 


The portions of dough were flattened into a circle, and a frozen jam cube (just kidding - jam apparently doesn't freeze; it was just a slightly firmer version of itself and a pain in the ass to get out of the ice cube tray) was set in the middle. The dough was then gathered up kind of dumpling style and smoothed into a ball.


Not frozen jam cube


Pinching the dough around the jam.


Smooth as a baby's butt


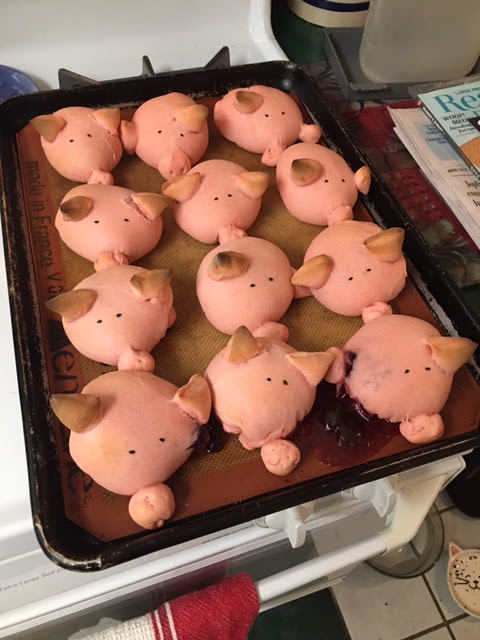
When all the balls were placed on the baking sheet, ears and snouts were made with leftover dough and attached with water PER THE INSTRUCTIONS. The snouts got nostrils courtesy of the sticks I bought for the Easter kabobs, and black sesame seeds were added for the eyes, again, stuck on with a drop of water.

Ears and snouts added


Nostrils added with cute stick


THEY ARE SO CUUUUUUUTE!!!


My husband came into the kitchen at this point and said, "These are fantastic! They are the best thing you've ever made for this challenge!"

He went back upstairs, I popped the piggies in the oven and set the timer for 20 minutes. I was pretty excited about how cute they looked, but in less than 15 minutes of baking, they were really smelling bready, so I took a peek into the oven, and oh!

OH, THE HUMANITY!

Their ears were getting too brown, their snouts were falling off, and they were bleeding out raspberry jam all over the baking sheet. I was devastated! Sadly, I removed them from the oven.

My husband requested one, in spite of the sad outcome.

One of the better specimens 


His verdict was they were the most amazing thing I've made from a visual aspect right up until they were baked. Obviously, water alone was not sufficient to stick the snouts and at least some of the ears onto the heads. The jelly oozing out gave more than a little bit of a gory aspect to the finished product. And my husband said they tasted fine, but they were just a hot roll with jelly and nothing special.

Inspiration photo lifted from the video

I'm feeling the need for a do-over, because I see potential for this, although you should ALWAYS be wary of cooking or crafting posts that only have a video for directions (especially when they are sped up), as they can edit the hell out of those. Stay tuned.


Sunday, April 17, 2022

O is for Oyster Crackers


#AtoZChallenge 2022 Blogging from A to Z Challenge letter


Supply chain woes are a very real thing.

Off the top of my head, I can name cream cheese, deli meat, canned soup, cat food, noodles, and Diet Dr Pepper that have disappeared from shelves for weeks at a time.

For "C," I was originally going to do a recipe for caramel cracker bites made with oyster crackers, but when I stopped at the store for them, I found there wasn't one bag of them on the shelf. Not only weren't there oyster crackers, there weren't any saltines, either. And it wasn't just at Walmart; I tried several other grocery stores, and NOT ONE had oyster crackers, and only one had a few saltine boxes. I complained about it to my friends at work and moved on to Plan B (Cheetohs Cookies). A week or so later, my friend came to work and handed me a Walmart sack with not one but two bags of oyster crackers (thanks, Nikki!). Supply chain mended, at least for now!

Lucky for me AND for you that I could turn this from a "C" post into an "O" post, because you're going to want to make these! 

I love caramel popcorn, and I will go on record as saying I make some of the best caramel popcorn you will ever eat, but it is a time consuming process. You have to pop the corn. Cook the syrup to a certain temperature. Stir the syrup into the popcorn and then stir it at 20 minute intervals for an hour as it bakes and do it as gently as possible to minimize breaking the popcorn into little bits.

Here's a quick, easy way to get the taste and crunch of caramel popcorn and get it fast: salted caramel cracker bites!

You need a bag of oyster crackers (when my son was little, he thought they were called "moister" crackers), brown sugar, salted butter, vanilla and kosher salt. That's it! 

Ingredient shot

Melt the butter in a large sauce pan over medium heat. Stir in brown sugar and vanilla and bring the mixture to a boil, stirring constantly. The surface of the mixture will look kind of fluffy, and that's when you will know you've got it at the right stage. Let it boil for 3-4 minutes, remove the pan from the heat, and add the bag of oyster crackers to the pan, stirring gently to coat every piece. Pour the mixture into a baking pan with sides that has been lightly sprayed with cooking spray. Sprinkle kosher salt over the crackers (I measured this with love, not a spoon) and slide the pan into a 350 degree oven for 8-10 minutes. When it comes out of the oven, let it cool a bit, then you can break apart big clumps with your hands (or leave them be, whatever). 

Note: I may have (okay, did) vary from the recipe directions in several places. I used light brown sugar instead of dark. I used Great Value oyster crackers instead of a name brand. I used pure vanilla extract instead of vanilla paste. I poured the crackers into the syrup and stirred rather than pour the syrup over the crackers and try to stir in the pan. I didn't use parchment paper in the pan.


Stirring the crackers into the syrup.


I lined the pan with aluminum foil, but the
next time I made it, I didn't bother.

Yum, yum, snackies!


Store in an air tight container. Try to refrain from eating the entire batch in one sitting; they are THAT good.


Protected Persons and Amazing Hair

I keep telling myself I'm going to start writing my TToT on Fridays, and I keep not doing that. Here are my Ten Things of Thankful for this week, brought to you very late on Sunday night:

I'm officially halfway through the A to Z Challenge! 

I had a message from a woman at my insurance company needing some information about the accident I was in two weeks ago when I got rear ended by an uninsured driver who had expired temporary tags and didn't possess a driver's license. When I called her back, she told me she needed clarification about me being a "protected person." "Uh, what is a protected person?" I asked. "It's someone who has a protective order against another party in the insurance claim," said the claims adjuster. "I don't think I'm one of those, unless you know something I don't know," I told her. She laughed and said the box must have been checked in error. Whew! 

My husband and I spent Easter weekend in KC with our daughter. Besides getting to spend time with her, I got to attend church in person (I know you're tired of hearing me say this, but I feel so happy and warm inside when I'm there). Friday evening's Good Friday service was moving and meaningful, and Sunday's Easter service was uplifting and positive. My heart is full.

Minsky's Pizza for supper. It will forever be my favorite pizza.


I'm afraid to say it and somehow ruin it, but my left hip is better. I've been pretty sure my IT band was injured at work. How, you ask? By being off with Covid, then, upon my return, doing my first Circle Time with my little nugs in nearly two weeks, sitting on the floor with them criss-cross applesauce and--yowchie! It has gotten worse and worse no matter how much I stretch it, so last night, I took two Aleve before bed and again this morning, and....no pain. I'm going to keep taking the Aleve until I burn a hole in my stomach, then I'll back off. Hoping it continues to do the trick.

As I was walking to Good Friday service (the church is half a block from my daughter's apartment), I met a gorgeous woman in her late 20s maybe as we both crossed the street, and as she walked towards me, she said, "Your hair looks amazing! Your curls are on fire!" Letting my hair go silver was a big decision, as was the decision to stop straightening it, and there are days when I feel like an old hag. This young woman has no idea what she did for me with those words, but I will never forget them and how pleased they made me feel.


Totally using Secret Rule 1.3 of the TToT Book of Secret Rules and calling this my list for this week!

You are invited to the Inlinkz link party!

Click here to enter