Saturday, April 30, 2016

Z is for Zeppole


Zoinks! "Z" is finally here!

This pin is one of the first ones I found when I was looking for Pinterest challenges for the A to Z Challenge. Does that mean I re-created the pin weeks and weeks ago, so it would be ready to post on the last day?

I think we all know better than that.

Here's the pin:


http://www.bakingbeauty.net/
easy-zeppole-recipe/


I don't know if these are really Italian or not. I will leave that up to my friend Marisa at SquaareCat to affirm or deny this as an Italian treat. Until then, I'm going with Italian.

The pinner claimed this was a 20 minute recipe. She lied. It was not. I'd call it a 45 minute recipe, a little less if you heat the oil while you're mixing the ingredients. But I digress.

The dough (which is really more of a batter) was made from two eggs, flour, sugar, baking powder, salt, vanilla, and ricotta cheese. Yep, you read that right. Ricotta cheese. (It HAS to be Italian if it has ricotta cheese in it, right?)

Beat the eggs until foamy, then stir in all the ingredients except the ricotta cheese and mix just until combined. Fold in the ricotta cheese and get ready to fry.


Dough.


Folding in ricotta cheese.


Dough + ricotta = batter


Scoop the batter dough batter with a cookie scoop and drop in the hot oil, turning occasionally. Here's where the pinner and I differ on the frying of the zeppole.


Here goes....


They look like hushpuppies.

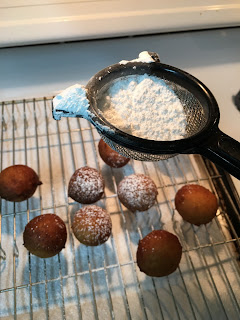
I don't deep fry very often, and what I know about deep frying would probably fit on the head of a pin, but 375 degrees was a little hot. The recipe called for frying the zeppole for 3-4 minutes, but less than two minutes after dropping my first few in the oil and they were so brown I thought they would be ruined if they stayed in any longer, so I fished them out, sprinkled them with powdered sugar after they had drained on paper towels, and then bit into one.


Oops. Perhaps a little, um, rare.


I took the pan off the burner until the oil cooled down to 350 degrees, then fried the next batch. Much better. I was able to leave them in for four minutes without overly browning them, and the innards were done this time.


And know what? They were really, really GOOD. Very tender inside. Sweet, but not too sweet. Who cares if they are Italian or not? After all, the only thing that REALLY mattered was that I had a topic for "Z"!


You're probably going to want to make these.

Pinterest WIN!


Friday, April 29, 2016

Y is for Yogurt Cake


I like yogurt. It's like healthier pudding, right? 

A recipe for Yogurt Cake, though, did not sound one bit appealing, but when you're searching for a Pinterest project that starts with a "Y", it starts looking a lot better. The word "easy" in the title cinched the deal.

Here's the original pin:


http://anitalianinmykitchen.com/
easy-yogurt-cake/

This woman got the recipe from an Italian lady she met at the grocery store while buying yogurt, and the ingredients are pretty simple. Flour. Sugar. Vegetable oil. Eggs. Baking powder. 

Yogurt.

Greek yogurt was her recommendation, and she preferred to use peach flavored yogurt. That sounded easy enough until I stood in front of the yogurt display at Walmart Neighborhood Market, and out of the seemingly THOUSANDS of containers of yogurt, there was not ONE of peach that didn't also include aspartame, which cannot be used in baking.

So I went with vanilla.

The recipe's directions were to use a medium bowl and a hand mixer. I used a medium-large bowl, and that wasn't big enough, as the batter spattered EVERYWHERE. I was sorry I didn't trust my gut and just use my Kitchen Aid, but lesson learned, and otherwise, the batter was very simple to put together. 


Make sure you forget to click the beaters into place so
they fall into the eggs and get all gooey. It's fun.


Can you see the droplets of batter all over the counter?
That's the tip of the iceberg, baby.

Into the pan and into the oven, but after 35 minutes, the center was still doughy. I ended up baking it for an additional ten minutes before it tested done. My next concern was called Trying To Get The Cake To Leave The Pan, which it didn't want to do. It clung very tightly to the bottom of the pan, and I feared it would crack and fall out of the pan in pieces, but a few more shakes and it landed on the cooling rack intact. Second lesson learned: next time, line the pan with a paper towel or parchment paper rather than just greasing it.


It LOOKS like the Pinterest pin.


As soon as the cake was cool (okay, cool ENOUGH), I put it on a plate and dusted it with powdered sugar. Still having low expectations about a cake with yogurt in it, I took a bite.

Ohhh, my! Y is for Yummy! 

The cake tastes very rich, the texture is light and it feels delightful in your mouth. I was afraid it would be too sweet, as the batter was VERY sweet, but it was just right. 


I got all fancy pants with the strawberry, see?

My husband loved it and has declared it our new signature dessert, in case we ever need a signature dessert. He requested I make it some time with lemon yogurt, but I gently informed him that wouldn't work (because I don't like lemon).

Pinterest win! Go make this now. 


Thursday, April 28, 2016

X is for eXploding boX


I'm getting creative here, both with today's Pinterest Challenge and with today's A to Z Challenge letter.

I happened upon this pin when I was searching frantically for something to do for "X":


http://www.creativehobbysupplies.blogspot.co.uk
/2013/08/exploding-box-tutorial.html

Obviously, I was pretty desperate to pick a Pinterest project this detailed when (a) I am nearing the end of the Challenge and (b) I have lost a lot of my will to produce quality posts.

But an exploding box? Exploding. Box. EXPLODING BOX? I'm in!

I stopped at Hobby Lobby where scrapbooking paper was 50% off and bought my paper supplies. I won't bore you with the details of this paper purchase; you just need to know that I needed several sheets of 12x12 cardstock for the box itself plus sheets of coordinating paper for decorating the box.

I had everything else on the list at home. Alllll except something called a bone folder/score board. Hobby Lobby was out of the little scoring tool (kind of a glorified plastic knife), and all they had were two different kits that included a plastic board with all kinds of grooves in it (I'm going to guess that is called a score board). One of them was $20 and one was $10. I walked away from them twice, telling myself I could just wing it on the project, but this little voice told me to do it right and get the kit. (That same little voice told me by no means to get the $20 one, though.)

Starting with a 12x12 sheet of cardstock, nine equal squares are traced and the corner blocks removed, then the remaining lines are scored (a fun little process of tracing the line with the plastic knifey thing guided by the grooves in the score board, and which I wondered briefly if I could have gotten the same effect with a popsicle stick and the crack in my table created by the drop leaf, but I quickly dismissed that thought when I saw how marvelously the tool and score board combination worked together).  The corners were rounded with a corner rounder tool.


Nine squares drawn lightly with a pencil.


Four corner blocks cut off.


Scored for easy and precise folding.

Repeat the above process two more times, using increasingly smaller dimensions each time.


Three boxes, three sizes.


  Corners rounded.

Then you make the lid, which was probably the easiest thing to do in the whole project and which I did wrong the first time and had to make a new one.


Measure twice, cut once. Glue
when you're damn sure you're right.


Left is right, right is wrong.


Fold the sides up, pop on the lid, and see? You've got yourself a box!


See? A box!

Embellishment time. I picked out some really pretty (I think) vintage-style paper for my box. I cut squares slightly smaller than the box side and rounded the corners (the directions gave exact measurements for cutting and made it really easy to follow). When these were glued onto each box side, the three boxes were nested together with the center squares glued together.


I love this paper.


IT'S SO PRETTY!

I embellished the top of the box, too, but chose to leave the sides plain.


The lid with embellishment.


Completed box.


I LURRRRRVE IT!


For the life of me, I couldn't figure out why this was called an exploding box. I guess because that's catchier than calling it a fall open box, which is really what it does, but call it what you want, it worked close enough for "X" and I call it A MAJOR PINTEREST WIN!

Here's a video of my husband's reaction:


I love my fall open box exploding box! 


Wednesday, April 27, 2016

W is for Window Covering


I had something really cool but really complicated lined up for "W". Really, I did! I bought the materials several weeks before the A to Z Challenge even began, but I have lost the will to do anything difficult.

As if by divine intervention, an alternate solution threw itself at me. After the preschoolers left at noon yesterday, the staff got together to set up for the upcoming Mother's Day programs. We were decorating tables and hanging scene setters on the wall and putting up the risers when my boss gave me and one of my co-workers three plastic tablecloths and said, "Here, make this":


Teensy problem. No link, no directions, just a picture. 

We had the three tablecloths stacked on top of each other and spread out on the floor. I got scissors and a stapler and a yardstick, and we set to work.

We stapled the top together so the plastic tablecloths wouldn't slip (they still did).


We measured two inch intervals and made little snips along the bottom.


Then took a deep breath and started cutting (seriously, who wants to mess up the boss's project?!). I made Mindy make the first cut up the middle, then we cut strips by eyeballing the width. Not going to lie, Mindy was much better at cutting her strips than I was.


And we didn't cut the rug ONCE.


When they were all cut, we taped it to the wall so it would cover a window behind the risers. Kudos to both me and Mindy for not falling off the risers, as they had not been locked into place and kept tipping backwards.


Each strip was made of three layers of tablecloth. We braided each strip about six inches. Know what happens when you braid really long strips of plastic tablecloth? The bottom part of the strips braid themselves together as well. Isn't that fun? After we braided the top part, we unbraided the bottom part.


I nixed the idea of knotting each braid as shown in the picture, as I had a bad feeling about trying to get all of those knots to line up in a nice row like in the picture. We just let them dangle casually instead, and I stand by that decision as being the smartest thing we did with the whole project.


See Mindy. See Mindy braid.
Good job, Mindy!

We hung some embellishments on it and made it cute. And we covered the window with yellow paper to diffuse the light.


And done! 

Of course, this was a Pinterest WIN, and not just because my boss is the one who found the pin and thought it would be GREAT as a backdrop....

Tuesday, April 26, 2016

V is for Vase (2016 Version)


Is it obvious to anyone else that I'm about over doing Pinterest challenges? Today, it's another easy project that I honestly didn't think would work anyway. I also forgot that LAST year, I ALSO did V is for Vase, but I don't even care.

Here's the pin:


http://weekendcraft.com/journal/
diy-recycled-easter-bunny-vases


Supplies needed were a glass jar, chalky paint, acrylic paint, and twine. I had everything except the chalky paint, so yay. Here's what you do:

Paint the outside of the jar with the chalky paint.


If you use a wide mouth job, you can stick your hand inside for ease of painting. 


Don't forget the bottom edge.


Dry it upside down. (Duh!)


Notice that one coat really isn't sufficient.  Read in the directions that the pinner added a second coat, even though she said one coat looked fine, and she did it only a few minutes after painting the FIRST coat, because the chalky paint dries really fast.

Believe her and start the second coat after about fifteen minutes.

Find out that the paint was most certainly NOT dry and make a goobered up part on the jar. make a mental note to turn that part towards the back.


Add the second coat a few HOURS later.

Just to be REALLY REALLY SAFE, don't paint on the face until the next day.


Apply Alene's Tacky Glue around the mouth of the jar and wrap it with twine.


Cute. Springy. Eastery.

Win.


Monday, April 25, 2016

U is for Umbrella


We're down to the difficult letters in the ol' A to Z Challenge. 

I wrote about underwear when I did the A to Z in 2014. 

I took pictures of my cat from under a piece of glass while she sat on top of it for 2015.

Topping either of those topics would be nothing short of impossible, so I found a craft instead; in fact, it is a FIVE MINUTE craft. Here's the Pinterest pin:

http://www.onegoodthingbyjillee.com/
2015/08/diy-5-minute-umbrella-wreath.html
#.Vx1h-fkrLIV

This was the most expensive Pinterest challenge I have done to date, but it may be worth it. The supplies needed are an umbrella with a curved handle, artificial flowers, and ribbon. That's it. I found the umbrella at Target for $12.99, the flowers at Michael's for $7.99 per bunch (I bought four) which were 40% off AND I had a 20% off entire purchase coupon, and the ribbon was only $1.00 at Michael's.

The directions did not specify to do this, because most people know enough to do it without being told, but the first thing I did was cut the tags off the umbrella and flowers. This may not sound like a big deal to anyone else, but my family will tell you I am really, really bad about leaving price tags on things (my mother always called me "Minnie Pearl" because of it).

First, you were to prop the umbrella up so it would stand up straight. The pinner used a basket with blankets in it, but as I didn't have a cute basket handy with blankets casually placed in it, I opted for the closest thing I had, which was a large Rubbermaid tub filled with the contents of my pantry. (It's a long story, but suffice it to say a mouse was involved, and I have freeloading cats.) 

I guess you could say it was a silver lining
that I had this tub in my dining room that I
could use to hold the umbrella while I worked.


Tie the ribbon into a bow around the middle of the umbrella. This creates the "vase."

Wired ribbon. I forgot to take the umbrella
into Michael's to match to the ribbon and
was just lucky that it matched.

Stick Arrange the flowers into the top of the umbrella.

Those umbrella ribs WILL fight you.


Ta da! You're done.

Ooooooo!


It fell over THREE TIMES before I
could snap a picture.


Now hang it on the front door, IF you have a hook big enough for the umbrella handle to hook into (I didn't and had to improvise with a rubber band looped around the handle).


Can you tell it was a little windy?


I LIKE IT AND IT WAS THE EASIEST CHALLENGE YET!