P is certainly NOT for pre-planning my A to Z posts, because while I had a handful of them planned and even executed well before the deadline, I kind of piddled out by "P." Thank goodness for Pinterest.
Introducing...Pig Buns.
There's a little video clip at the top of the web page for this recipe that hooked me, and if I were smart enough to be able to embed it on this post, I would. Just do yourself a favor and hop over to the site and watch it. It's only about a minute, and you will see what hooked me.
To make Pig Buns for an A to Z Challenge post that needs to be published tomorrow, you should have looked at the recipe before today. I imagine it's obvious I didn't, so it's 10 pm as I write this, and the project is barely started.
If I had read the recipe yesterday, I would have done the first step yesterday, which is to spoon strawberry jam (I'm using raspberry because I like it better and the end result should be the same) into ice cube trays and freeze for a minimum of 4 hours. When our refrigerator died in January and we had to buy a new one, among the many other things that went wrong with getting the refrigerator delivered and installed was that the ice maker was on back order for at least 6 months. As a result, we have two ice cube trays in the freezer at all times (we are big time ice users), so I had to sacrifice one of them to freeze the jam (I would have sworn we had some cheap, blue ice cube trays in the basement, but they were nowhere to be found).
 |
| I had not realized how much this looks like congealed blood until I saw the photo I took. Eww. |
After the jam went into the freezer, I messed around in the kitchen with something for "Q" (no spoilers), washed some dishes by hand and loaded the dishwasher. When I got bored with that, I went upstairs and took a little cat nap in my big comfy chair, then wandered back down to the kitchen to start the dough.
The recipe is from the UK, so all the measurements are in grams and milliliters. I am fortunate that our kitchen scale can be programmed to give weights in grams, or I would have been looking for another "P" project. It's a straightforward bread recipe: let the yeast proof in warm milk, then beat in eggs, butter, and sugar in a stand mixer, followed by the flour and some salt. Add red food coloring to make the dough pink, then use the dough hook to knead the dough about 4-5 minutes. Transfer to a greased bowl (or turn the dough out onto a cutting board, wash and dry the Kitchenaid bowl, grease it lightly with cooking spray, plop the dough back in the bowl, cover it, and place the bowl in a warm place; in my case, I turned the oven on and set the bowl on the back of the stove to get warm, as my kitchen is cold).
 |
| Measuring in weight, not volume. |
'
 |
| The dough coming together, food coloring added |
 |
| Pretty in pink. |
After an hour, the dough had doubled in size, and I used my trusty scale again to help measure the dough into roughly equal portions of 85g (more or less).

 |
| Not frozen jam cube |
 |
| Pinching the dough around the jam. |
 |
| Smooth as a baby's butt |
When all the balls were placed on the baking sheet, ears and snouts were made with leftover dough and attached with water PER THE INSTRUCTIONS. The snouts got nostrils courtesy of the sticks I bought for the Easter kabobs, and black sesame seeds were added for the eyes, again, stuck on with a drop of water.
 |
| Ears and snouts added |
 |
| Nostrils added with cute stick |
 |
| THEY ARE SO CUUUUUUUTE!!! |
My husband came into the kitchen at this point and said, "These are fantastic! They are the best thing you've ever made for this challenge!"
He went back upstairs, I popped the piggies in the oven and set the timer for 20 minutes. I was pretty excited about how cute they looked, but in less than 15 minutes of baking, they were really smelling bready, so I took a peek into the oven, and oh!
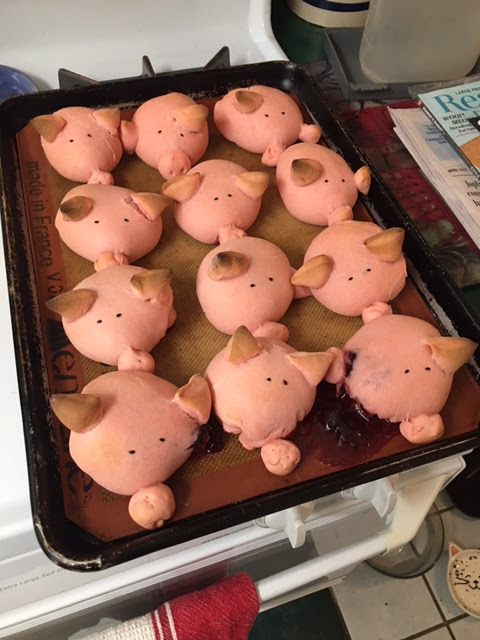 |
| OH, THE HUMANITY! |
Their ears were getting too brown, their snouts were falling off, and they were bleeding out raspberry jam all over the baking sheet. I was devastated! Sadly, I removed them from the oven.
My husband requested one, in spite of the sad outcome.
 |
| One of the better specimens |
His verdict was they were the most amazing thing I've made from a visual aspect right up until they were baked. Obviously, water alone was not sufficient to stick the snouts and at least some of the ears onto the heads. The jelly oozing out gave more than a little bit of a gory aspect to the finished product. And my husband said they tasted fine, but they were just a hot roll with jelly and nothing special.
 |
| Inspiration photo lifted from the video |
I'm feeling the need for a do-over, because I see potential for this, although you should ALWAYS be wary of cooking or crafting posts that only have a video for directions (especially when they are sped up), as they can edit the hell out of those. Stay tuned.
