Sunday, April 29, 2018

Z is for Zeta


Last letter. Last Pinterest Challenge. 

I thought about making something out of zucchini. Meh. I tried to find a craft, but all I found was Zentangles, which are very cool but which I did a couple of years ago (you can see how I accidentally drew a vagina on the Zentangle drawing I made for the post).

I randomly searched through Pinterest, and one thing led to another and naturally, I wasn't even LOOKING for a "z" project anymore when I ran across a previous search for sorority crafts.

I happen to have a daughter in a sorority at the University of Arkansas. Her sorority happens to start with a...

Z!

Of course, I couldn't find any DIY crafts; pretty much all I was coming up with was Etsy products, so I decided to make my OWN project, and if you're looking for an easy sorority craft, I've got one for you.

I bought some wooden (or maybe wood-LIKE) letters (and I am fortunate that my daughter's sorority doesn't have a pi or a phi or a delta in it and I could get the letters at a plain ol' craft store), a fresh bottle of Mod Podge (who really uses up a bottle of Mod Podge before it dries out, anyway?), a couple of sheets of pretty scrapbook paper (only needed about half of one, but better safe than sorry) and a bottle of craft paint that matched the paper.

I traced the letters onto the scrapbook paper and VERY VERY CAREFULLY cut them out with my VERY VERY SHARP craft scissors. I sprayed the backs of each paper letter with repositionable adhesive spray and then stuck them on the letters, making sure there were no bubbles or wrinkles in the paper.

See me utilizing the straight edge of
the paper for the top of the T?
Work smart, not hard!


I turned the letters jelly-side down and used a VERY VERY SHARP Xacto knife to trim any paper that was past the edge of the letter, then flipped them back over and painted a thin layer of Mod Podge over the paper.

Truth: when the Xacto knife scraped
the edge of the wood instead of cutting
the paper, it set my teeth on edge.


VERY VERY THIN coats of Mod Podge.


Lather. Rinse. Repeat.

After about the fourth coat of Mod Podge (I let each coat dry about 20 minutes before applying the next), it occurred to me that I had not painted the edges of the wooden letters, and that was a rookie mistake, because then I had to paint them VERY VERY CAREFULLY so I didn't get paint on the paper.

Ugh. Idiot.


While the paint dried, I added one more coat of Mod Podge.

And it was done. I had a craft that was just as pretty as anything I might have found on Etsy:


I took the letters to my daughter this morning, and....

SHE LIKED IT! HEY, MIKEY!

This is probably one of my favorites, and it's not even a real Pinterest win. Just a win! She even asked if I would make a set of them this fall to give as a gift when she gets her "Little"!

And thus ends my 2018 A to Z Challenge.

Peace out.


Friday, April 27, 2018

Y is for Yeast


You know, I'm about worn out from Pinterest projects, so I looked for something easy (I hoped) and delicious (I hoped) for Y.  

I love bread. And if you don't love bread, too, then it means we can't be friends, unless you ask for extra bread and give it all to me instead. I buy yeast by the pound. By. The. Pound.  Do you know how much one of those little packets of yeast at the grocery store weighs? I don't, either, but I know there's only 2-1/4 teaspoons of yeast in one, and that can't possibly weigh very much. Fun fact: I keep my yeast in a late 1970s Tupperware container that belonged to my mom.


Anyway, here's the Pinterest pin:

http://www.lifeasastrawberry.com/
easy-crusty-french-bread/


The recipe swore it only took two and a half hours to make this, with the caveat that the FIRST time might take a little longer, with all that recipe reading you had to do. Stopwatch set....

In my trusty Kitchen Aid mixer (a wedding gift and 25 years old this summer), I proofed the yeast with a teaspoon of sugar and some warm water (for you non-bakers out there, proofing is feeding the yeast a little sugar and giving it a nice drink of warm water, and, if the yeast is still alive, it repays you by getting all foamy and ready to go to work. If it doesn't get foamy, throw it out and buy fresh yeast, because you are no longer baking yeast bread and instead will end up with something that resembles a floury stepping stone.

Next, kosher salt and flour was added and stirred with the dough hook until the dough gathered itself into a ball. The dough hook was then removed and the dough ball lightly floured, then turned over and the bottom floured as well. Then I covered it with a tea towel (my friend's 90+ year old mom makes awesome tea towels and I am the lucky recipient of several of them that I use when bread baking) and left it to rise.

Dough obligingly gathering itself into a ball.

Ready to be tucked into a tea towel so it can rise.


After an hour, the dough was flopped out onto a floured surface, more flour was sprinkled on top, and the dough was shaped into a round loaf, then turned upside-down and laid in a well-floured, small mixing bowl and covered with the towel again. 

Much sprinkling of flour in this recipe. 


Floured again and in the small mixing bowl
for its last rise.

While the dough sat and cogitated, I turned the oven on to 460 degrees F (a strange number, I thought, because we tend to bake things in 25 degree increments) and put a dutch oven in the oven (same one used to make the stove top chocolate cake last week). The dough was then tipped out of the bowl back onto the floured surface, then gently laid on a square of parchment paper (for ease of putting it in the now VERY HOT dutch oven), The lid went on and into the oven it went for 30 minutes.

Shaped and ready to bake.


And in the (very hot) dutch oven,
ready to pop into the oven.

Ohhh, the smell as it baked! Trust me, it was heavenly.

After half an hour, the lid was removed, my husband pulled the parchment paper out from under the loaf, saying I didn't need it any more (I refrained from saying BACK OFF, BUDDY, THIS IS MY PROJECT), and it went back in the oven for another ten minutes, which I thought it didn't need and my husband, Mr. I've Made Bread In The Dutch Oven Before, said it did, and OF COURSE, I was right, because the bottom was a little browner than I personally like.

Isn't it simply lovely? And plenty brown enough?

It was supposed to cool for 20 minutes, but as my family has proven repeatedly in this Challenge, they are incapable of waiting for food to cool and want immediate gratification, which leads to cakes sticking in the pan and taffy burning your hands and bread that is ENTIRELY too hot to cut, but I did it anyway.


And it was delicious.

And it was pretty easy.

And it took three hours.

And I'm going to make it again. Soon. Often.


Thursday, April 26, 2018

X is for eXtremely Creepy Baby - A Sequel


You do ONE creepy Pinterest project, and you are branded for life.


My herb garden.


If you haven't read C is for Creepy Baby, please do, right now....

I really loved that project. Not THAT creepy, in spite of what some people say (namely, the ones living in my own house). My planters are on my kitchen windowsill, happily growing basil and rosemary out of the tops of their heads. It's fun. It's quirky. It's a conversation starter. (It's also in the background of several pictures illustrating my A to Z posts.)

Then friends started sending me stuff like THIS:


How could I resist?

The Pinterest pin I found is actually a link to a video on how to make a doll nightlight. I needed a doll with a porcelain head, a nightlight, and an extender for the nightlight. That's pretty much it.


http://www.markmontano.com/2012/07/
doll-head-night-light-diycreepy-fun.html


I ran by the DAV thrift store and had my choice of at least half a dozen porcelain head dolls. I picked this one:


She's had a hard life. My mom would have
said she was rode hard and put away wet.

Once home, the first step to making the nightlight was to remove the hair from the doll. Looking at her looking at me was worse than the trusting looks I got from the Peeps I used  to make Rice Krispie treats for "L is for Layered Peeps."


Her eyelashes fell off after taking a direct
hit from the Goo Gone.


Way worse.


That's better....

After I got the wig off, and after I tried to put it on Nora's head for a picture and she flipped it back behind the work bench in the basement and I don't know if I'll ever be able to reach it to retrieve it and some day, that bench will be moved and someone will think there's a dead animal with a pink bow back there, then, THEN, I had to get the glue residue off the head. I accomplished this with Goo Gone and VERY CAREFUL scraping with my utility knife.


Once her head was clean, all I had to do was put the nightlight in the neck hole and plug it in. I'm not going to lie here. The light doesn't fit in the neck hole perfectly like the one in the video, and I'd like to know how many thrift store dolls that guy went through before he found the PERFECT fit, but it fits good enough for now. I'm going to get my previous partner in crime, a/k/a Daddy, to help me secure the nightlight safely, because, guys....

I NAILED IT.


Mike drop....

Wednesday, April 25, 2018

W is for (Pizza) Waffles


When I was a kid, we had a big, square waffle iron that made four waffles at a time (this predates Belgian waffle irons, so each square was fairly large but the waffles were thin by comparison). I suspect it was a wedding gift. Sometimes, we would have waffles for supper, and my mom would set up a tv tray next to the dining room table for the waffle iron, and I feel like my dad was the one who actually cooked the waffles table-side (and that would be because his place at the table was closer to the electric outlet than my mom's; my place was closest, but no one in their right mind would have put ME in charge of cooking the waffles). 

I didn't like waffles, but what I DID like that my mom made in the waffle iron was grilled cheese sandwiches. She could cook four at a time (because it could make four waffles, get it?), and they were the best grilled cheese sandwiches in the universe! They were covered with crispy little squares from the pattern of the waffle iron, and I always ate my sandwich by nibbling along the lines until I got it down to four tiny squares.

I have a Belgian waffle iron, it makes two waffles, and it does NOT hold two grilled cheese sandwiches. In fact, I've never even made ONE sandwich in it, because the bread is bigger than the cooking surface for one waffle, and it wouldn't be right if it hung over into the waffle space next to it and then wasn't symmetrical.

I guess it's this unfulfilled need for a grilled cheese sandwich cooked in our old waffle iron that has led me to try to cook OTHER foods in the waffle iron, most of them courtesy of Pinterest, all of which have been abysmal failures (with the exception of chocolate cake batter cooked in the waffle iron, then after the chocolate waffles cool, turn them into ah-maz-ing ice cream sandwiches). There was the macaroni and cheese in the waffle iron, where oil from the cheese ran out of the waffle iron and puddled on the counter. There was the hash browns in the waffle iron, which stuck horribly in spite of copious amounts of cooking spray and didn't get all brown and crispy like the picture. There was the canned cinnamon rolls cooked in the waffle iron that turned out like cinnamon flavored hockey pucks.

Today, there was pizza waffles.

https://www.babble.com/
best-recipes/food-hack-pizza-waffles


The Pinterest recipe used a round waffle iron and canned biscuits for the crust. I have a rectangle waffle iron, and using square peg-round hole logic, I opted for crescent roll dough instead of biscuit dough. In theory, this was a great idea, because not only was it better shaped, it was more like pizza dough than a biscuit would be. In practice, it would have worked better had the can of crescent roll dough in the back of the refrigerator not been (slightly) expired, resulting in dough that did NOT unroll nicely, instead, crumbling and breaking apart and sticking to my cutting board that I probably should have floured first but didn't.

Trying to shape the shards of crescent roll
 dough into squares. but who cares, because
it stuck to the board and had to be pried loose
in pieces anyway.


The dough was to be flattened and laid on the waffle iron, then a spoonful of pizza sauce, mozzarella cheese, and any toppings went on next with a caution not to overfill it. A second piece of flattened dough would go on top, the edges pressed together, and then the waffle iron closed.

See? Pieced together. I wasn't kidding.


There was much sizzling coming from the inside of the waffle iron, and I was getting a very bad feeling about pizza sauce and oily cheese leaking out onto the counter and crescent roll dough hopelessly stuck to the inside and wishing I had sprayed it with cooking spray first. Then the little light went out and I opened it cautiously....


Feeling a little uneasy about this.


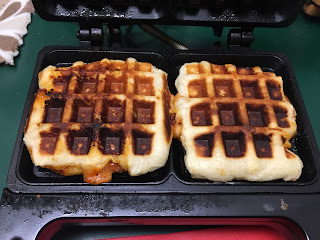
Hey! I have pizza waffles!


And they were GOOD! Not enough filling inside, but still good! And it didn't make enough to feed more than one hungry person of pioneer stock or two gentrified people with very small appetites, but it was good AND IT DIDN'T STICK AND IT DIDN'T SPILL ITS GUTS OUT OF THE CONFINES OF THE WAFFLE IRON AND ALL OVER THE COUNTER.


See? Not enough filling.


It also still wasn't a grilled cheese sandwich....


Tuesday, April 24, 2018

V is for Vegan Chocolate Chip Cookie(ish)


I'm not a vegan. No one in my family is a vegan. No one is even a vegetarian. I don't have any friends who are vegan, or at least, not any that are near enough that I see them on a regular basis.

What I am is in need of a "V" post, and when you type just a "v" into the search bar on Pinterest, the first thing that comes up is "vegan recipes." 

I found this recipe, and it intrigued me. I mean, seriously, how could this be palatable?

https://witandwhistle.com/
2011/11/09/chickpea-cookie-pie/


Challenge accepted.

(Let me clarify before I go any further that the pin I found was by a blogger who was using a recipe from another blog. Full disclosure and all.)

The recipe is for Chickpea Cookie Pie, kind of like the giant cookie cakes you can get at Great American Cookie Company at the mall, but upon reading the ingredients (and yes, I do occasionally read through all of them before I start a project), I found the first ingredient listed was canned white beans OR garbanzos. There was a piece of luck, because when I checked my pantry shelves, I discovered my husband used all the canned garbanzos when he made hummus a few weeks go, but I had several cans of white beans that I was planning to use in some soup. Change of plans, beans. You are now dessert.

I rinsed and drained two cans of white beans and put them in the food processor with brown sugar, baking soda, baking powder, canola oil, vanilla, salt, quick oats, and applesauce. This was not an appetizing combination:


I whirred it all together, then gave it a taste. It TASTED like chocolate chip cookie dough, but it was very, very runny, more like cake batter than cookie dough. It also had a gritty texture, caused by the oats and not the beans, surprisingly enough. Chocolate chips were stirred in and it was ready to bake.

The directions said to pour it into a greased pan, preferably a springform pan, and preferably a 10" springform pan. I got out a flashlight and poked around in the very back of my cabinet for my springform pans. I used to have three, a set I bought at the Nashville Flea Market some 25-30 years ago. They are of dubious pedigree, but I rarely use them anyway. The smallest of the pans bit the dust a number of years ago, but I had the 10" one (and one slightly smaller). The removable bottom was off-kilter, and I spent some time trying to get it to fit correctly in the bottom of the pan, and it refused. And the reason it refused is because the springer thing that pulls the rim tightly together no longer pulled it tightly together. I had to resign myself that it just had to be good enough, put the whole thing on a cookie sheet in case anything leaked out (nothing really did) and pour the batter in.

I set the timer for 35 minutes (the directions said 35-40), and when my timer went off, I checked the cookie, and it was completely raw in the middle. I let it bake another 10 minutes, took it out of the oven (because SURELY it was done by NOW), loosened the ring on the springform pan, and let it cool about ten minutes. When I came back, I tried to cut a little piece and . . . it was STILL raw inside. Fortuitously, I had forgotten to turn off the oven, so I turned it up from 350 degrees to 400 and put the cookie back inside for five minutes, but the edges looked like they were getting too done (they weren't) and took it back out. Still underdone, but I was OVER done and I left it on top of the stove.

It LOOKS done, but looks are deceiving.


After it had cooled another 10 or 15 minutes, I finally tasted it.


Oozy, undercooked goo.


It was hot and gooey (in an underdone sort of way) and the oats were kind of gritty and the chocolate chips had melted into a mass instead of staying individual chips and I thought it was pretty disgusting.

Ewwy gooey, emphasis on ewwy.


I took a few bits of it to preschool with me, and I felt like it was a little better after it cooled than when it was warm from the oven.

I tried it again when I came home at lunch time, and it was still gooey in a not-done-yet way, but it had improved.

12 hours later, it's not bad. And I would never in a million years guess that the base of the dough was made with white beans.

If you're a vegan and love gooey, chocolatey desserts, this is for you.

If you're not a vegan, just make chocolate chip cookies and enjoy them; life is short.


Monday, April 23, 2018

U is for Upholstery Cleaner


When we bought our house 19+ years ago, we bought new furniture for the family room: a couch with a hide-a-bed and two comfy chairs. We were careful with this furniture when our son was little, not letting him eat while sitting on it, but when our daughter came along, all bets were off. She laid on that couch and ate dry cereal and candy and popcorn and goldfish crackers, and if someone were spending the night on the hide-a-bed, I had to open it up and VACUUM the mattress of Nerds, Skittles and Fruity Pebbles. 

The couch has looked a little (a lot) rough for a number of years now, so I bought a slipcover for it. It tucks in and ties on and looks really nice, as long as no one sits on it. It is also washable, so periodically, I take it off the couch, empty the cereal and crackers and candy into the trash can, and wash and dry it. (The REALLY REALLY FUN part of doing this is the part marked "center front" is actually the center back and I always forget and put it on upside down every time.)

Fast forward to the A to Z Challenge, and if you are a participant, you know the second half of the alphabet is harder than the first half. Think about it: Q. U. V. X. Y. Z. I was looking through Pinterest for something, ANYTHING, for "U" and found DIY upholstery cleaner. Perfect! Something useful, for a change (although how can a robot hand that can flip the bird be anything BUT useful, I ask you?).

http://www.houseforsix.com/blog/
useforfive.com/2015/05/how-to-clean-
upholstery-also-known-as.html


I pulled a cushion out from under the slipcover. Ugh. It looked worse than I remembered.

18 years of life with Emma.


The pinner dusted their cushion with baking soda and vacuumed it off first, and I think this was more to deodorize, because it was a piece from a thrift store that was going into a baby's room, but I did it to my cushion, too, because why not? 


The DIY concoction was simply 1 part dish soap to 8 parts water. The fun part was using the mixer to whip the two together into a fluffy bowl of bubbly foam. 


The bubbly part ONLY - no water - was scooped out by hand and rubbed into the cushion. I went over the cushion (and I only did about a third of it, so I could better compare the before and after) twice and the bubbles rubbed into it barely made it damp.

Rubbing the soap bubbles in.


Next, the cushion was wiped with a clean, damp rag twice, and this would remove the dirt and the soap residue. 

I let it dry overnight.

My husband said he saw a difference between the part of the cushion I hadn't cleaned and the part I had. I mostly noticed that the cushion was very, very faded, and no amount of soap bubbles were going to do a thing for that. 

In the kitchen light, you can see a difference
between the left side, that I didn't clean, and
the right side that I DID clean.


To me, the difference was subtle at best. I was hoping for WOW!

I got underwhelming.

Top picture (in living room light)
is before, bottom picture is after,
and yes, Nora had to be part of it.


Sunday, April 22, 2018

T is for Taffy


For "T" I wanted to make tiny tacos. How cute and delicious would that be?! I was immediately shot down by my husband and the Med School student, the latter of whom asked for taffy, because he didn't get any earlier in the day when we went to Silver Dollar City (an 1880s theme park near us). 

My great aunt used to make taffy for us when I was young. I remember her pouring it into a white, oval platter that had been buttered, and when it was cool enough to handle, we would pull it. Well, we would pull it for a little while. She usually finished the job, and she could pull it until it was light and a little airy and laid in ribbons without puddling.

I've never made taffy myself. Toffee, yes, taffy, no.  But I found a pin....


http://www.ruralroute2cookbook.com/
candy/saltwater-taffy/


The ingredients are pretty simple: light corn syrup, sugar, butter, water, salt. This recipe also had a little cornstarch in it, and I can't say I remember my great aunt using it in hers, but whatever. 

The instructions said to bring the mixture to a boil and cook over medium heat, stirring constantly, until it reached 256 degrees Fahrenheit (also known as hard ball) on a candy thermometer.


I think that, not unlike with the Stovetop Chocolate Cake project, the stove at the lake house is a little off, because it took 52 minutes for the mixture to reach hard ball. 52 minutes. 52. Minutes. That's a hella lot of stirring constantly. Once it FINALLY reached hard ball, I added two teaspoons of vanilla (I bought some after i didn't have any for the Stovetop Chocolate Cake) and a few drops of red food coloring, so my son could see the color change when the taffy was pulled. This turned out to be an unfortunate choice of colors, as you will see in a moment.


The drops of red food coloring, mixed with
the brown of the vanilla, made for a
not-very appealing color of pink.


I had a barrage of "Is it ready to pull?" comments, which I ignored, since the one who made the comments convinced me to turn the Stovetop Chocolate Cake out of the pan when it was still warm, causing it to stick in the bottom of the pan. Besides, if you have ever pulled taffy before, you know that you DO NOT want to handle it when it's too hot, unless you don't care if you have fingerprints anymore or not.

Forty-five minutes later, it was finally cool enough to handle, and we buttered our hands and started pulling. The Med School student is much stronger than I am (he must take after my great aunt), and his taffy took on a paler shade of pink pretty quickly. We traded off and he essentially did all the hard work of the pulling and I'm not sorry.


I'm not going to lie. I was tempted to form this into
something not G-rated, and had my son not
been there, I would have done it.

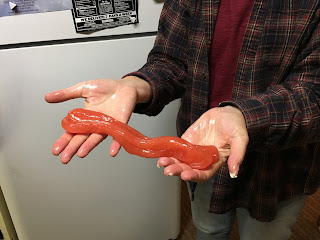
We got tired of pulling after about fifteen minutes, and since it was becoming tacky rather than slippery, I decided to call it good, and we laid it out on a buttered cookie sheet, where the pinky color made it look like entrails. Yum....


"It looks like intestines," said the one who would
know what intestines look like.

Then we tried it.

Med School student's comments:

"It's not sticky, which I think is a positive."
"I'm hoping I burned some calories from pulling it."
"Tastes like a vanilla Tootsie Roll."

Husband:

"Good. Delicious. Not sticky - that's very important."

And me? It tasted very, very much like I remembered from when my great aunt made it for us. And that's a very good thing.

And it was all gone by this morning. That tells you it was a win!