Saturday, April 30, 2022

Z is for Zebra Cake


#AtoZChallenge 2022 Blogging from A to Z Challenge letter


I have been dreading my "Z" post a bit, not only since it's one of the tough letters, but also because I wanted to go out on a high note, and I hadn't found any topic to fit the bill. Desperately scrolling through Pinterest and trying to pull up ideas that started with "Z," I finally found something: Zebra Cake.

In all my Pinterest prowling, I had never run across a zebra cake before. It looked like it could be more trouble than it was worth, but desperation will get you the day before the deadline, so zebra cake it was. I found a recipe from Half-Baked Harvest, where I got the amazing Hot Honey Chicken, but it had ingredients I wouldn't use if you held a gun to my head, namely, coffee, so I kept looking. Betty Crocker had a much less complicated version made with cake mixes instead of from scratch, and I rationalized using this one since the zebra cake is more about the process than the method. Scratch cake, mix cake, the process of getting a cake to look like a zebra was still the same, and I was REALLY over complicated recipes.

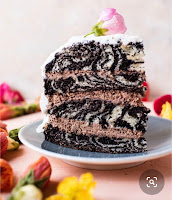
Here is my "inspiration" photo, from Half Baked Harvest:


Here is the one from Betty Crocker:


Here's the process, regardless of whose recipe you use: make a vanilla batter, make a chocolate batter, layer them in cake pans, bake, frost, done.

I made the white cake batter first, because I could transfer the batter to another bowl and then make the chocolate batter in the Kitchenaid bowl without washing it first (work smarter, not harder). That was the easy part.

What I had in the pantry

Neither source had really clear cut instructions, and this is the one time a video would have come in handy, because the directions were to put about a quarter of a cup of white cake batter in the bottom of each of three 9" cake pans followed by a quarter cup of chocolate and so on. Each layer of batter was supposed to spread out on its own, but mine didn't. They just sat there, thickly, and refused to move, even if I jiggled the pan, so I put a little more batter in, more like half a cup of each batter but with no better results. I resigned myself that it was still going to taste good, even if it looked no more like a zebra than I did, and put the pans in the oven.

Here I am, doing it wrong


It quickly became apparent that I did not put the same amount of batter in each pan (maybe because I kept forgetting where I left off) when, after baking, each of the three layers were a different thickness. I had a Papa Bear layer, a Mama Bear Layer, and a Baby Bear Layer. I decided to put the Papa Bear layer on the bottom and the Baby Bear on top, and perhaps the weight of Baby and Mama would smoosh the Papa Bear layer, and in theory, that would have worked. In practice, it did not.

Papa Bear, Mama Bear, 


The cake, when cooled, was supposed to be frosted in white, but I had already determined that this zebra was going to need vet care anyway, possibly ending in euthanasia, so instead of white frosting, of which I am not a huge fan unless it's a wedding cake, I made chocolate and I am not one bit sorry.

Layer, layer, layer

Adding frosting


So yes, I was expecting the inside of the cake to be mostly beige with splotches of brown at worst, and at best, just a marbled cake. And know what? I actually got some zebra stripes, leading me to believe that, had I not panicked and only used a quarter of a cup of cake batter with each layer, I would have had a more zebra-y cake.

My husband, who didn't see a photo of a zebra cake before I made this one, was impressed, not only with the stripes, but also the taste (I couldn't really screw that up, since I used mixes). "It's really cool!" he kept saying. He took his empty plate back to the kitchen, presumably to put it in the dishwasher, but came back with another big slice of zebra cake. 

Behold, a zebra filet!

What better way to finish out the A to Z Challenge than with a win! 


Thursday, April 28, 2022

Y is for Yamcakes


#AtoZChallenge 2022 Blogging from A to Z Challenge letter

Yeah, so, it's "Y" and Imma say Yippee, the A to Z is almost over!

I couldn't think of anything to do for "Y" except yams, and I don't even like them.

I'm now making something with yams....

Okay, not really, because yams and sweet potatoes are two entirely different foods. According to the University of Illinois Extension Office, yams are native to Africa and Asia and can grow to 5 feet long. They have a tough, scaly skin that is hard to remove and are starchier and drier than sweet potatoes.

Sweet potatoes have a thin, smooth skin and are classified as either "firm" or "soft." The soft ones become soft, moist, and sweet when cooked and typically have dark orange skin and flesh. They are native to Central and South America. 

The confusion of names began when African slaves began calling "soft" sweet potatoes "yams" because they resembled the yams from Africa. The "firm" sweet potatoes were introduced to the US first, so when the "soft" variety were first grown commercially, they were called "yams" to differentiate them from the "firm" variety. Today, the USDA requires that when "yam" is being used to describe sweet potatoes, the words "sweet potato" must also be included in their labeling. Unless you found it at an ethnic market, most likely the yams you are eating are actually sweet potatoes. 

I couldn't find a recipe for anything I would remotely eat that was made with yams/sweet potatoes, so I decided to make my OWN recipe. If I can make pumpkin pancakes and applesauce pancakes, what's to keep me from making yams/sweet potato pancakes? Nothing! May I present....

Yamcakes

15 oz can yams/cut sweet potatoes in syrup*
2 cups buttermilk complete pancake mix
1/4 c. brown sugar
1 tsp. cinnamon
1/4 tsp. clove
1-1/4 to 1-1/2 c. water (I didn't measure very well, so at the risk of turning into my great aunt Daisy, put in enough water to make a batter)

Forgot the brown sugar for the photo. Oops.

Drain the yams/sweet potatoes and mash well with a fork. Add the dry ingredients and mix, then start adding water until it "looks right". Lightly grease whatever griddle or pan you like to use for pancakes, even if it's a non-stick one (since the batter has sugar in it, they are more likely to stick than plain pancakes) and cook the yamcakes. Turn over when the bubbles on the surface stop popping. Remove to plate, sprinkle with powdered sugar, and serve with your favorite syrup. Makes 6-8 good sized yamcakes. 

*something you should know (or may already know if you use canned sweet potatoes for other dishes), but sweet potatoes have weird little hairy bits on them that don't always get removed in the peeling process in the sweet potato factory. I picked all of them out because YUCK


It may be part of the potato, but I
recommend picking off those hairy parts.

Sideways photo of dry ingredients.
Beyond caring about it.

Stir, stir


They smell really good.

Mmmmm!

With addition of pecans.

My husband said they were great, REALLY great, second only to the Hot Honey Chicken I made for "H" as far as my A to Z experiments went. I made him a couple with pecans sprinkled on them, and he declared them EVEN BETTER.

So what seemed like a big Yuck to me turned out to be an even bigger Yum!

Wednesday, April 27, 2022

X is for eXtra


#AtoZChallenge 2022 Blogging from A to Z Challenge letter


I am stretching the ol' rules of the A to Z Challenge a bit with today's post, but I have no regrets for that: I turned an every day treat into something a little eXtra!

My husband is a big fan of brownies, and he got our children hooked on them, too. I used to be uppity and only made brownies from scratch, but when the demand surpassed my desire to be uppity about scratch cooking, I started buying brownie mixes. They are certainly quick, easy, and reliable. The other three always wanted me to add chocolate chips to the brownie mix each time, and I did, sometimes, but I don't care that much for chocolate chips, especially IN BROWNIES, so I ignored them as often as I could get away with it.

The other day, I remembered some brownies I was once served at friend's home that were her "go to" for company. She took a regular brownie mix, made it according to directions, poured half of the batter into a pan, then took an almond and toffee chip Hershey's Symphony bar, broke it apart, and laid the pieces over the batter and covered them with the remaining batter. The brownies were extra moist and had a little crunch from the almonds and toffee. That's extra, right? A big candy bar buried in a brownie? 

I picked up a Symphony bar and a brownie mix at the store and set to work mixing the batter. But as I did, I felt that adding the candy bar to the brownies wasn't enough to make this recipe "extra" enough. I dug around in my baking supplies and came up with a bag of Kraft caramel bits. For those of you not in the know, the caramel bits are like you took Kraft caramels, pinched off pieces, and rolled them into balls about the size of a piece of Trix cereal (I have no idea what else to use for scale). So after I laid the pieces of candy bar all over the batter, I generously sprinkled it with caramel bits. Still not satisfied, I came up with a bag of pecan pieces and sprinkled those on next, then I scattered some mini chocolate chips over the whole thing, carefully poured the rest of the batter over all the extra stuff, and baked it. 

Nuthin' fancy, just Betty Crocker
fudge brownie mix


Symphony bars first. See all the space that
doesn't have candy on it? Need to fix that.

Okay, fixed it!


Ah, sweet mystery of life, at last I found thee! These brownies are excellent! The chocolate bar melted into the brownie, making them extremely rich tasting. The chocolate chips did the same, and the caramel bits also melted into the brownie and made them extra chewy and gooey. The pecans provided excellent crunch. These brownies are exponentially better than the ones with just the candy bar baked into them.

Fresh out of the oven. Doesn't look like
much, but there's potential lurking under there.


I ate half of it before I remembered I needed a photo

If you want a brownie to end all brownies, this is exactly what you need to make


W is for Watermelon


#AtoZChallenge 2022 Blogging from A to Z Challenge letter

Oh, how I love watermelon!

When I was a kid, we had it a lot in the summer. My dad also loves watermelon, and his favorite kind is called a Black Diamond: solid green and more round than oblong. When HE was a kid, he got in trouble for standing in the watermelon patch and cutting just the hearts out of the watermelons and eating them (hey, he gave the rest to the cows, so no waste!). I mean, it's the best part and all. 


He also told me if I swallowed any of the seeds in a watermelon that one would start growing in my tummy. I was TERRIFIED of that happening (he also had me convinced that cows that lived in the mountains had two legs shorter than the other two, so they wouldn't tip over, among other things he told me and I believed). Now that seedless watermelons are a thing, it removes that threat and I can enjoy watermelon without fear of growing one.

I am terrible at picking out watermelons (and my dad says he is, too). I've read all the articles and hints, and I still manage to pick the worst one out of the bin on many occasions. I soldier through, though, and eat as much of it as I can before giving up. But oh, if I'm lucky enough to get the perfectly ripe, red watermelon that is dripping with juice! It's worth the sacrifice of picking out some, er, lemons, so to speak. (And for the record, I HATE anything that is watermelon flavored; give me the real thing or nothing at all.)

Probably the number one reason I get some watermelon duds is because, in my excitement for watermelon season, I buy them way too early in the season. The really good ones don't ripen locally until around the 4th of July, and the best, BEST place to find them is at an Old Order Mennonite farming community near Rich Hill, Missouri, about a half hour's drive from my dad's house. They have a booming wholesale business selling watermelon and also cantaloupes that are almost as big as basketballs and sweeter than sugar, and they also have a kind of co-op fruit and vegetable market with goods coming straight from their gardens. (Bear in mind this entire business is done without electricity, using work horses pulling plows instead of modern equipment and paper and pencil instead of calculators and computers.)

So I'm ready for some delicious, fresh watermelon, but it's entirely too early in the season, sooooo....

Nom nom nom


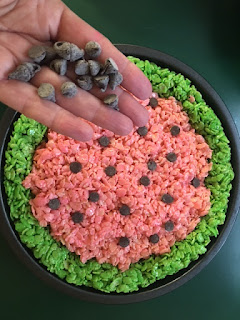
These Watermelon Rice Krispies Treats that I found on Pinterest were fun, not that hard, and sweet and delicious (although not juicy). 

You make them just like any other Rice Krispies treats, except you do it in two batches. Batch #1 is made with the addition of green food coloring, batch #2 is made with pink food coloring.

Melt marshmallows with butter

Add green food coloring

Stir in the Rice Krispies and pour into
9" cake pan that has been sprayed 
with cooking spray

Smoosh the mixture around the edges,
but not too firmly, or the whole thing
will be hard as a rock instead of 
squishy and marshmallowy


Do the same thing again, only
this time, make it pink


Smoosh the pink mixture inside
the green ring and make sure it
presses into the green layer 
well so it doesn't separate

Add chocolate chip "seeds" by 
pressing them into the spaces between
the Rice Krispies. Note: I picked them
out of mine before eating, because 
I prefer seedless watermelon....

And there you go! Watermelon that is in season any time and is never under (or over) ripe!


Monday, April 25, 2022

V is for Vegetable Soup


#AtoZChallenge 2022 Blogging from A to Z Challenge letter


I'm a picky eater, but my son? Gahhh!!! He only ate about five things from three until well into college: pizza, hamburgers, chicken legs, beans. It was aggravating, to say the least, but the fifth food he ate is what prevented him from getting scurvy or rickets or something: the kid loved soup. He would eat pretty much anything if it was in a soup. Fortunately, we are a family of soup eaters, and I made it fairly often, especially in the fall and winter. Our favorite was plain old vegetable soup.

I grew up on vegetable soup, which my mom made when we had leftover roast beef. At some point in the early to mid-1970s, though, EVERYONE'S mom in the Kansas City area started making vegetable soup from a recipe originated by the Plaza III restaurant on the Country Club Plaza and known as Plaza III Steak Soup (and which was made with ground beef and not really steak, although the restaurant's recipe says they used ground steak; I assure you, none of the home cooks were doing it that way!). I once babysat our neighbor's kids when I was in junior high, and the kids wanted leftover Steak Soup as their bedtime snack. It was truly that good!

When I went to college and eventually got an apartment of my own, my mom showed me how to make this Steak Soup. I could eat on it for a week and still have leftovers to put in the freezer. Over the years, my vegetable soup recipe took on some subtle changes from the original Steak Soup, but most of the key elements were there.

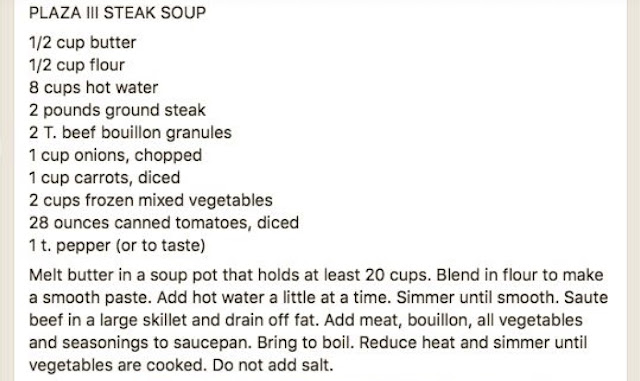
I looked up the recipe today when I decided to make vegetable soup for my "V" entry in the A to Z Challenge:


Here's what makes this soup special from any other vegetable soup you will eat: it's the butter and the beef bouillon. I know this because I haven't used those ingredients in my vegetable soup in so long that I didn't even remember that I USED to until I read the recipe today. 

I did remember a couple of changes my mom made that I fully believe are worth veering off the recipe directions. After browning the ground beef and draining it, I put the butter (and I only used half a stick of butter and felt like it was plenty rich that way) into the pan with the meat and after it had mostly melted, I stirred in the flour. I then added the beef bouillon granules, the hot water, onion, potatoes instead of carrots (because it isn't vegetable soup to my family without potatoes), frozen mixed vegetables (see? didn't need extra carrots), canned tomatoes, and pepper and brought it to a boil, then let it simmer for about an hour (or until the potatoes are done). I tasted it and decided to add a little more bouillon granules, and the soup was perfection! 

Beef browned and butter added

Gotta have taters in vegetable soup

Frozen mixed vegetables

Ingredients in a pot

An hour later, and it's hot and delicious soup!

My husband, who is NOT a picky eater but knows good food, said it was fantastic! He was amazed what a difference it made to have that butter in the soup. 

Yearning for some comfort food? MAKE THIS. Add some Easy Peasy Breadsticks and you've got yourself a meal!

Mmmmmmm!


Sunday, April 24, 2022

U is for Unused Hot Dog Buns


#AtoZChallenge 2022 Blogging from A to Z Challenge letter

A real perk of my job is that I get fed every day for free. I seldom eat the breakfast, as I have a nice bowl of oatmeal every morning (actually, a Solo cup of oatmeal, because I eat it in the car on the way to work), and they serve eggs a lot, which I detest, but I'm all in for lunch.

We have a lot of chicken. Usually it's grilled or baked, and most of the time it's pretty tasty (occasionally, I accuse the food service people of feeding us buzzard meat, but fortunately, those meals are few and far between). The kids prefer breaded chicken, but they'll eat pretty much anything as long as they have some ketchup. 

We have hot dogs twice a month. Since over half of the kids in the school are under 4 years old, their hot dogs are cut up (choking hazard, you know), and we only give them half of a bun as a serving. As a result there are always a LOT of leftover hot dog buns.These extra hot dog buns languish in a plastic bin on the center island of the school kitchen, never to be eaten, unless I come along and turn them into....

Breadsticks! I know it sounds crazy, but I can turn day old (or week old or even two week old) hot dog buns into delicious, garlicky breadsticks, and now you can, too! 

Easy Peasy Breadsticks

1 package of hot dog buns (day old, preferably)
2 sticks of butter or margarine
1 tsp. garlic powder

Preheat oven to 225°.

Melt butter or margarine in a pie plate or other shallow dish. Stir in garlic powder.

Cut each hot dog bun lengthwise and separate sections, giving you 4 sticks per bun. Quickly dip the cut sides in the butter, then lay on a large cookie sheet.

Stale hot dog buns


Cut each bun in half length wise and separate
into four pieces

Melt butter and stir in garlic powder,
then quickly dip cut sides of bread
into the butter and place on baking sheet

Bake for 1-2 hours. Breadsticks should be golden brown and dry to the touch when done. Very dry buns will only take an hour; fresh buns will take two hours. Makes 32 breadsticks.

Bake 'em


Done! Sorry, no artsy photo on a plate. I'm tired.


Note: you will need two cookie sheets for this recipe. Get creative with them; I usually add dried parsley or dried Italian seasoning to the butter. They can also be sprinkled with sesame seeds or grated parmesan cheese before baking.

You have to make these. They prevent waste (although not waist, because trust me, you can't stop eating them once you start). And no one will ever believe you made them from stale hot dog buns!


So I Bought A Planner And More Thankfuls

The A to Z Challenge is winding down. I'm wearing down. Someone remind me next year that I am not organized enough to cook something and write about it 26 times in a month unless I PROMISE to do it ALL before the actual Challenge begins. Now it's on to this week's Ten Things of Thankful!

1. I bought a planner. That's the first step. Actually using it will be the trick.

2. The week went by quickly.

3. I forgot my purse (how does someone walk out the door and get in the car without noticing they don't have their PURSE?) one morning this week and remembered it when I was only a third of the way to work. I'm thankful I realized it wasn't in the seat next to me as soon as I did, because if I hadn't until I got to work, it would have been so not good, as I'm the one with the key.

4. I was able to turn around, drive home, get the purse, and get to the child development center where I work by 6:46, only one minute late. I even dodged deer on the way through the park and STILL made it. Don't ask how.

5. It is still dark when I get to school every morning (although it's getting lighter and brighter each morning). The door I have to use to enter the locked building is directly under a bird nest, and no matter how much I prepared myself for it, I still jumped out of my skin every morning as the birds inside came flying out just above my head. The bird nest has been, um, relocated. I'm still jumpy as I walk up to the door, but so far, there has not been any new nest construction.

6. After much rain and cold, we finally got decent weather for playing outside. We need our outside tiiiiiiiime!!!

7. We talked about Earth Day this week at preschool, and my sweet little nugs were very engaged! We went outside shortly after we first talked about how we could help keep the Earth happy, and several them spent most of their outside time picking up little bits of paper and pieces of broken toys and throwing them in the trash can.

8. What absolutely made my week was the messages from several parents telling me their child told them all about recycling and reusing and gave their own mini lectures to their families (keep in mind my nugs are 2 and 3 years old). One supervised the placing of items in the recycle bin to make sure they were sorted properly, one looked for items in the recycling that could be reused instead and lectured his parents about turning off the lights, and one has chattered about recycling at home all week. The kids even discussed recycling at lunch on Friday after we played a game of sorting items for recycling or trash. They were debating whether food could be recycled or not (they decided not, I told them if it hadn't touched their mouths it could be reused and eaten another day, hopefully paving the way for them to now eat leftovers at home!). This is proof that what we say and do with our kiddos really does make a difference - make it a positive one!

9. Aleve. Or the generic of Aleve, anyway. 

10. I found a teeny, tiny turtle while on a walk. He made me happy.

Baby red-eared slider. He was pretty 
speedy. Not sure why he was on the
sidewalk (truly just hatched?), but he
was making a beeline in the direction
of the creek and was not amused by
me dropping my debit card next to
him for scale (didn't have a banana)


I TOLD you he was tiny!

Look at me, getting my TToT done 24 hours before the link closes! Now you can write YOUR list and link up, too! 

You are invited to the Inlinkz link party!

Click here to enter